How to set up Multi-Factor Authentication on your Microsoft 365 account

Online security is a top priority for businesses and individuals alike. With the increasing number of cyber threats and data breaches, it is essential to take measures to protect our sensitive information. One effective way to enhance security is by enabling multi-factor authentication (MFA) on your Microsoft 365 account. 

Multi-factor authentication, also known as two-factor authentication, is a security process that requires users to provide two or more forms of identification to access their account. This adds an extra layer of protection as it ensures that even if someone knows your password, they will not be able to hack into your account without the additional form of verification. 

Setting up MFA on your Microsoft 365 account is an effortless process that can be completed in a few steps: 

Step 1: Sign in to your Microsoft 365 account

The first step is to sign in to your Microsoft 365 account using your login credentials. This can be done via the desktop application or the online portal

Step 2: Go to the security and privacy settings

Once you have logged into your account, navigate to the security and privacy settings. This can usually be found under the “My Account” or “Security” tab. 

Step 3: Choose your preferred method of authentication

Microsoft 365 offers several options for MFA, including using a mobile app, phone call, or text message. Choose the method that works best for you. Using a mobile app, such as the Microsoft Authenticator app, is highly recommended as it provides an additional layer of security. 

Step 4: Set up your chosen method of authentication

If you have selected the mobile app, you will need to download and install it on your device. Once installed, follow the instructions to complete the setup process. If you have chosen the phone call or text message option, you must provide a phone number for verification. 

Step 5: Verify your identity

After setting up your chosen method of authentication, you will be prompted to verify your identity by entering a code or accepting a notification on your device. This ensures that the MFA is working correctly and can be used to access your account. 

Step 6: Save the authentication settings

Once you have successfully verified your identity, save the changes to your authentication settings. This will enable MFA on your account, and you will now need to provide the additional form of authentication whenever you log in to your Microsoft 365 account. 

Congratulations, you have now successfully enabled multi-factor authentication on your Microsoft 365 account! This will significantly enhance the security of your account and protect your sensitive information from cyber threats. 

It is essential to note that MFA should be enabled for all users in an organization, not just for a few individuals. This ensures that the entire organization’s data is safe, and any potential breaches can be prevented. Remember, security is an ongoing process, so stay vigilant and keep your defenses up-to-date!

Now you know how to protect your data from unauthorized access with Multi-Factor Authentication (MFA). But what if your phone number changes?

Click below to follow our simple step-by-step guide shows you how to update your MFA phone number in minutes!


How to change MFA Phone Number for Microsoft 365 Account

As technology continues to advance and security threats become more prevalent, it is important to take proactive measures to protect your online accounts. One of the most effective ways to secure your Microsoft 365 account is by setting up Multi-Factor Authentication (MFA). MFA adds an extra layer of security by requiring you to provide an additional form of verification, such as a code sent to your phone, when logging into your account. 


However, in some instances, you may need to change the MFA phone number associated with your Microsoft 365 account. This could be due to a change in your personal phone number or switching to a new device. Whatever the reason may be, it is a simple process to update your MFA phone number and ensure the security of your account. Don’t have MFA enabled yet? Scroll to the bottom of this tutorial for the guide which explains how to set it up for an extra layer of protection!


Before we dive into the steps, ensure that you have admin access to the Azure portal. Additionally, you should know the user whose MFA details will be updated. This information is crucial to ensure that the changes are made to the correct account. 


Now, let’s take a look at the steps for changing your MFA phone number for your Microsoft 365 account: 


Steps to Change the MFA Phone Number:
STEP #1: Sign in to the Azure Portal · Go to https://portal.azure.com.
  1. Sign in with an account that has the necessary admin permissions.
STEP #2: Navigate to Azure Active Directory
  1. In the left-hand navigation pane, select Azure Active Directory.
 STEP #3: Find the User
  1. Under Manage, select Users.

  2. Use the search bar to find the specific user whose MFA phone number you need to change.

  3. Click on the user’s name to open their profile.

 STEP #4: Manage User Settings
  1. In the user profile, under Manage, click on Authentication methods.

STEP #5: Update the Phone Number
  1. If the user has an existing phone number configured, you will see it listed.

  2. Click on the Edit icon (a pencil) next to the phone number.

  3. Update the phone number to the new desired number.

  4. Click Save.

STEP #6:  Notify the User
  1. Inform the user that their MFA phone number has been updated.

  2. The user should verify that the new phone number works for MFA by attempting to sign in.

Additional Considerations: 


  • Backup Methods: Ensure that users have backup MFA methods configured, such as an alternate phone number or an authenticator app, to avoid being locked out.
  • Policy Compliance: Verify that the change complies with your organization’s security policies.

It is important to note that you should have at least two methods of verification set up. This could be a phone number and an email address, or even two phone numbers. With multiple methods, you can ensure that you always have a way to verify your identity and access your account. 

But be mindful that changing the MFA phone number for a Microsoft 365 account will not disable MFA. The user will still be required to provide the additional factor for authentication. 

 In conclusion, with the rise in cyber threats, it is essential to secure your Microsoft 365 account with MFA. By following the simple steps outlined in this blog post, you can easily change the MFA phone number for a user account in your organization. It is recommended to regularly review and update MFA details to ensure the security of user accounts. 

Don’t have MFA enabled yet? Follow this simple guide below that explains how to set it up for an extra layer of protection!

Allowing/Blocking Emails or Domains in Microsoft 365

Tired of being swamped by a flood of unwanted emails? Longing for the ability to manage your chaotic inbox?  

It’s completely understandable to feel overwhelmed by the influx of unwanted emails. You’re not alone in this constant battle against spam and irrelevant messages.   

However, there’s no need to worry, as there are effective ways to regain control over your inbox!   

We’ve prepared for you, a comprehensive tutorial that will guide you with the necessary knowledge and tools to curate your email experience, enabling you to embrace the desired emails and eliminate the unwanted ones.  


Step ONE: Sign in to Microsoft 365 Admin Center

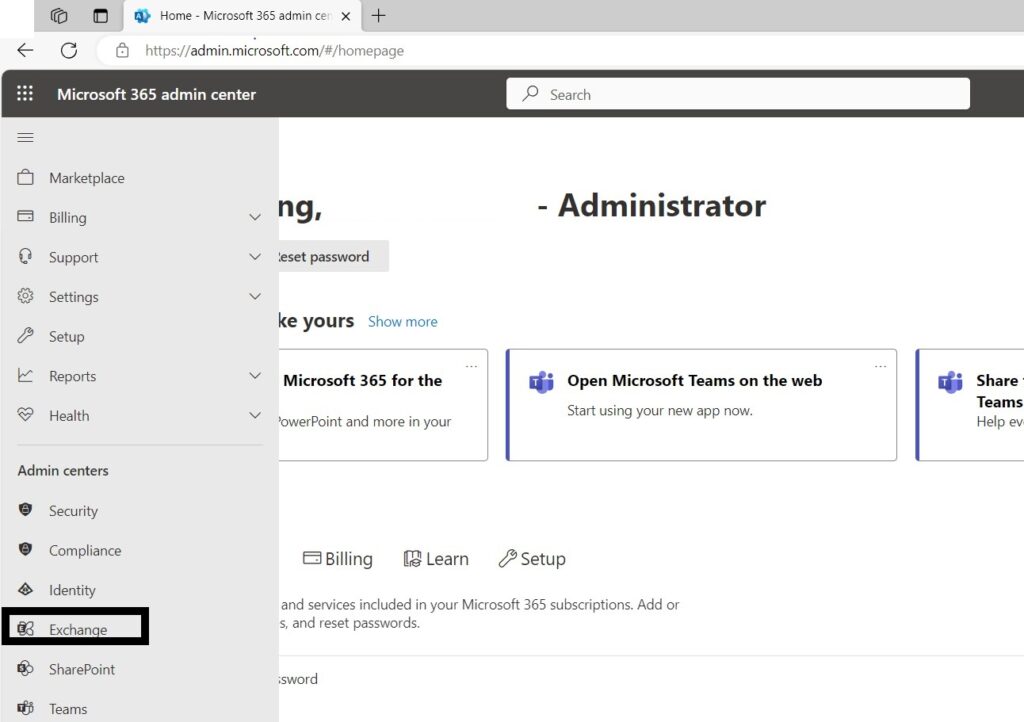
Step TWO: Access the Exchange Admin Center

  • In the Microsoft 365 Admin Center, select “Admin Centers” from the left-hand navigation menu. 
  • Choose “Exchange” from the list of admin centers. 
sc1

Step THREE: Navigate to Mail Flow Rules

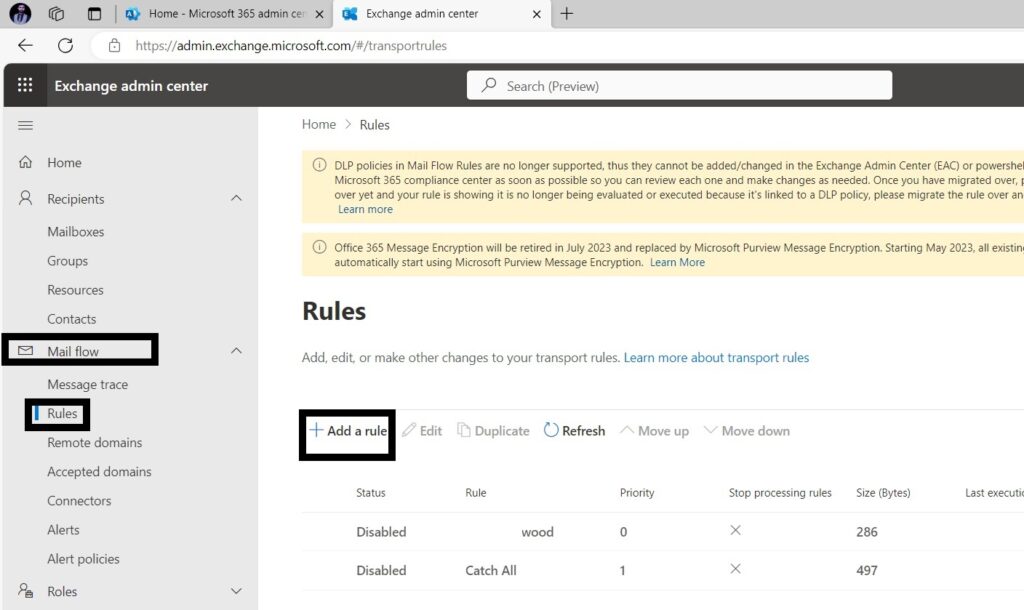
  • In the Exchange Admin Center, go to “mail flow” from the left-hand navigation pane. 
  • Click on “rules.” 

Step FOUR: Create a New Rule (Allow/Block)

  • To allow or block emails from specific senders or domains, you can create a new rule. 
  • Click on the “+” (New) button to create a new rule. 
  • Choose “Create a new rule” from the dropdown. 

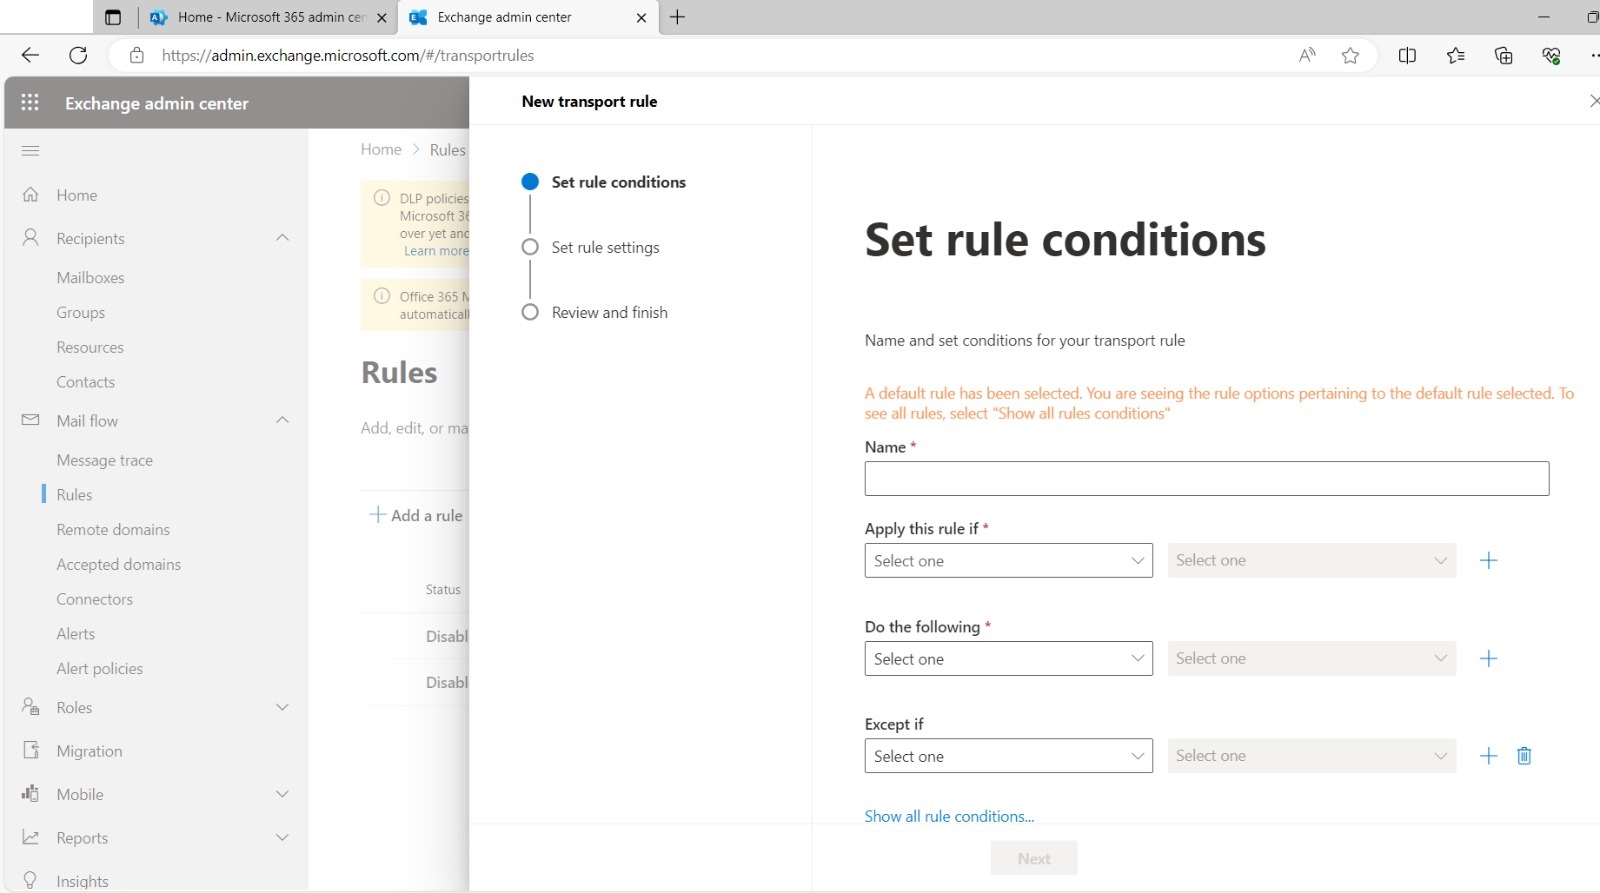
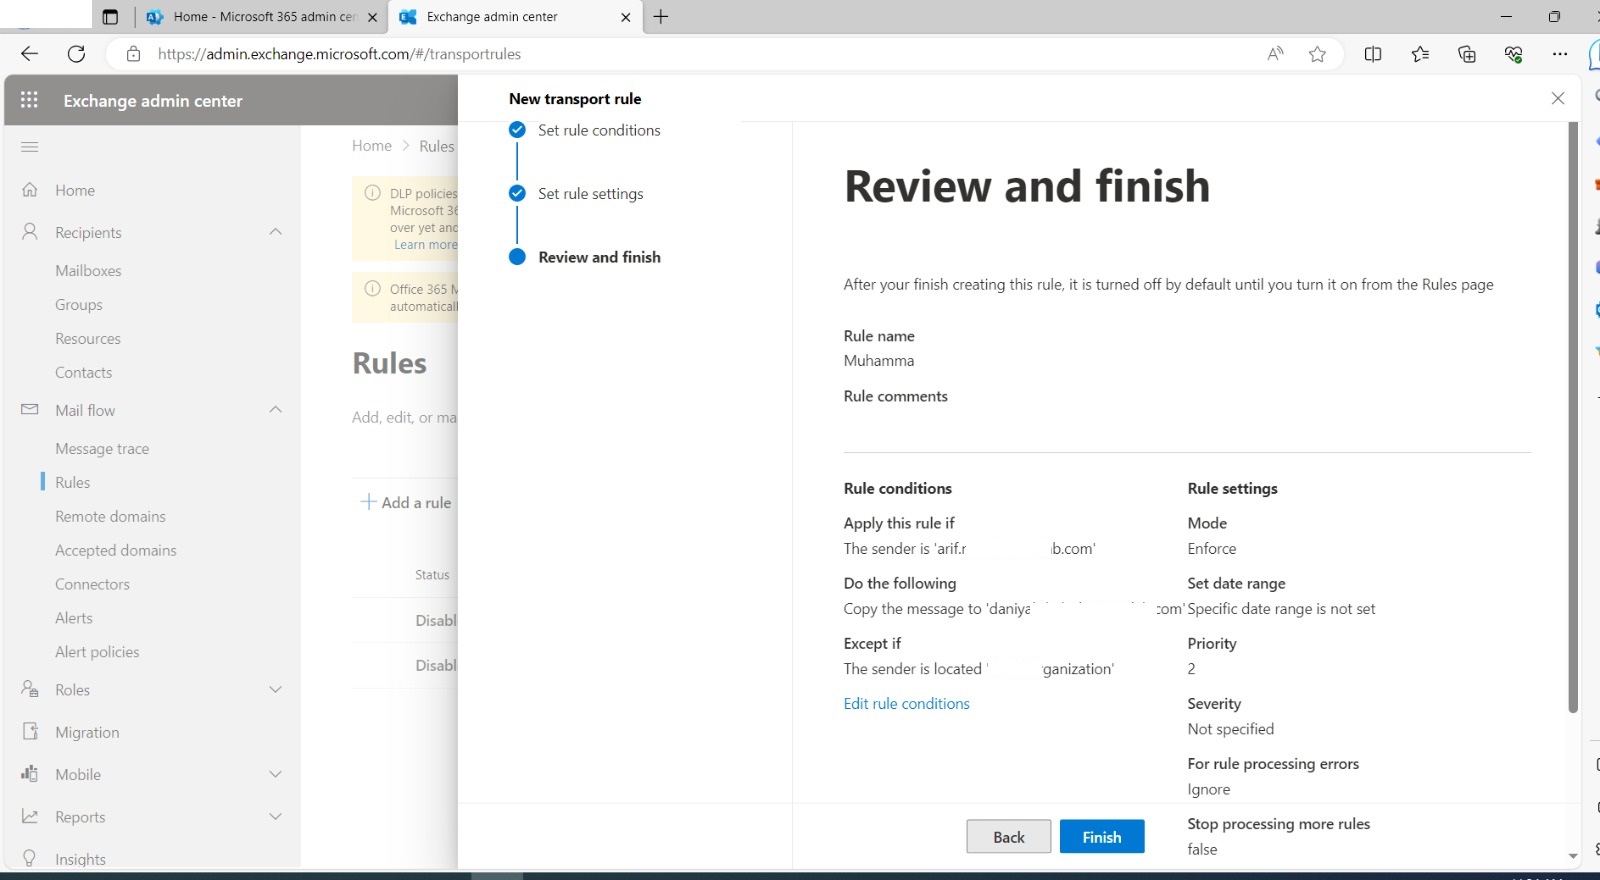
Step FIVE: Configure the Rule

  • Give your rule a name that describes its purpose. 
  • Under “Apply this rule if,” you can specify the conditions such as the sender’s address or domain. 
  • Under “Do the following,” select either “Block the message” or “Redirect the message to” and specify the action. 
sc3
sc4

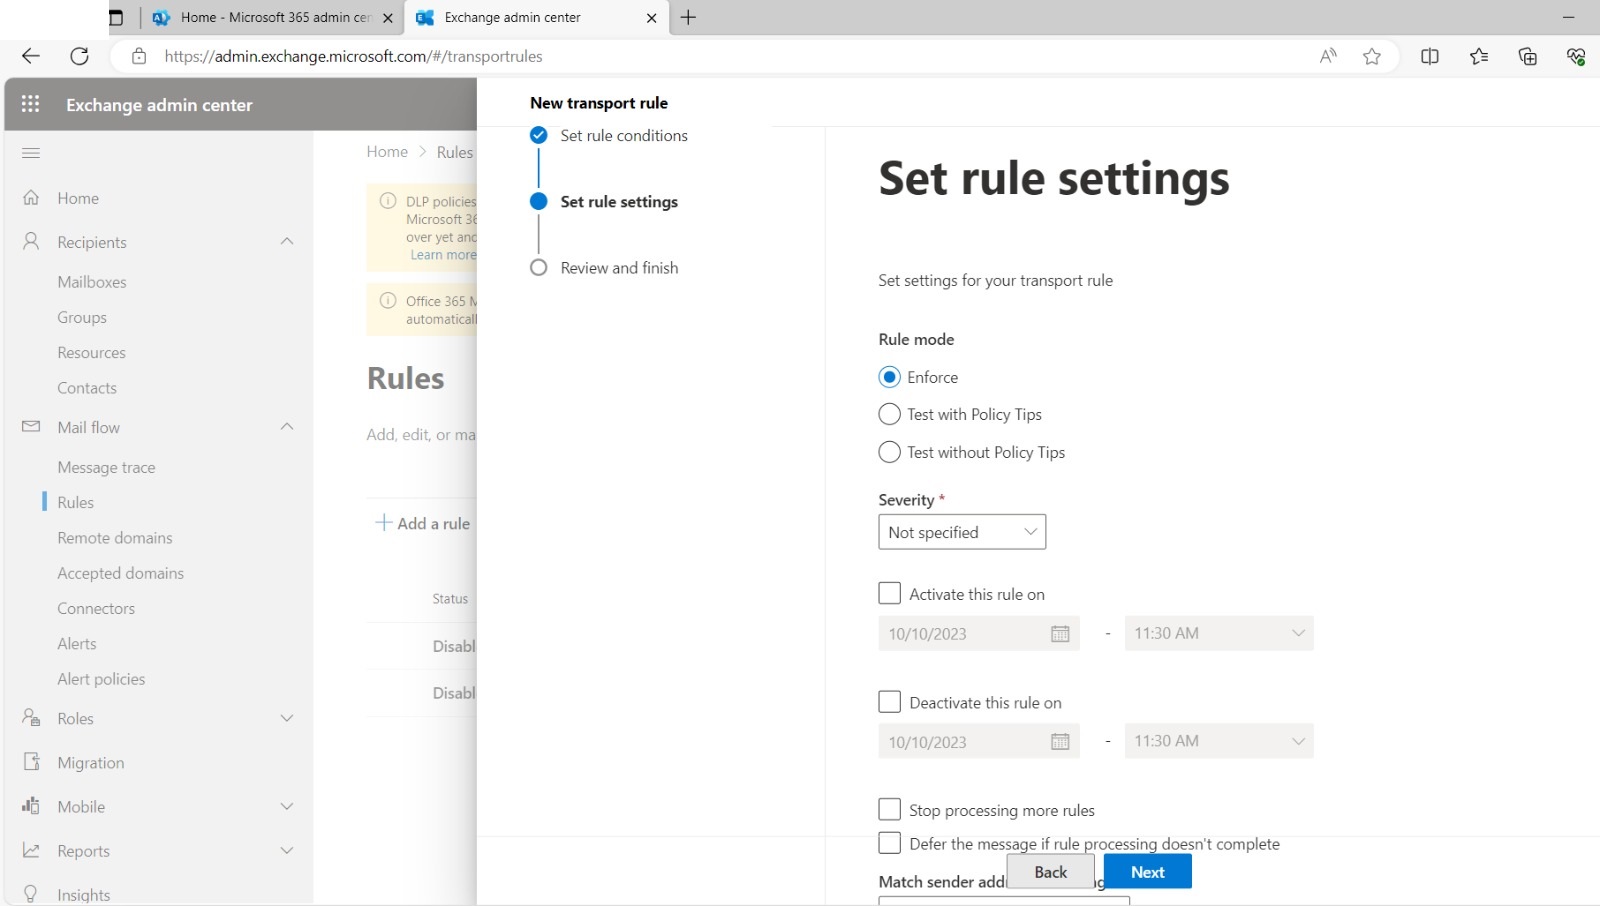
Step SIX: Save the Rule:

  • After configuring the rule, click “Save” to apply it. 
  • This rule will now allow or block emails from the specified sender addresses or domains based on your configuration. 

Now you can experience a world without spammy marketing blasts or annoying notifications that clutter your inbox. Say goodbye to wasting precious time sorting through irrelevant emails.


With the power to allow and block, you can create a personalized email sanctuary where only important and desired messages flow freely.