Finding the World of Restricted Mailboxes

In today’s world, we are constantly connected to each other through various means of communication. One of the most popular methods of communication is through email, which allows us to send and receive messages at lightning-fast speeds. However, in the vast ocean of emails, there exists a lesser-known world that many people may not be aware of – the world of restricted email inboxes.


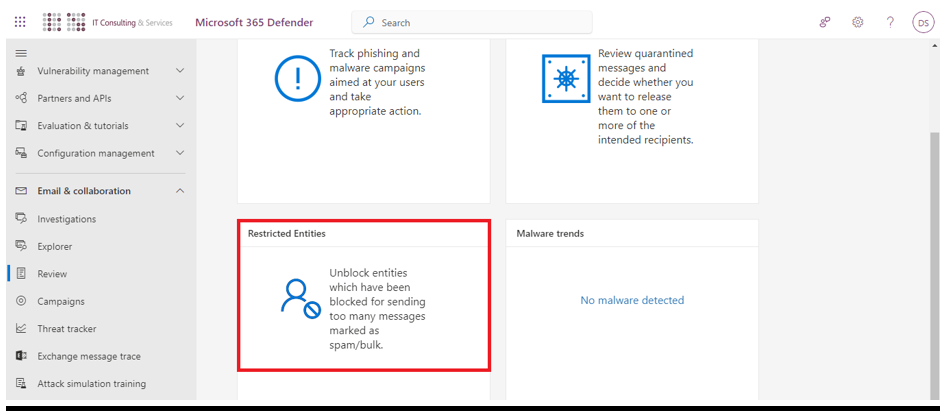
In this tutorial, we’ll show you how to access restricted mailboxes and unblock restricted entities. 

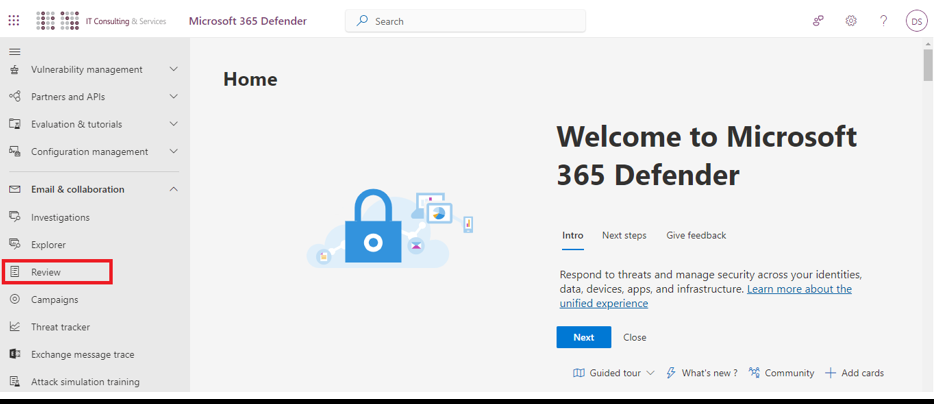
  • Open the Microsoft 365 Defender portal.
  • At the left menu, and below “Email & collaboration“, click on “Review“, and finally click on “Restricted entities“.
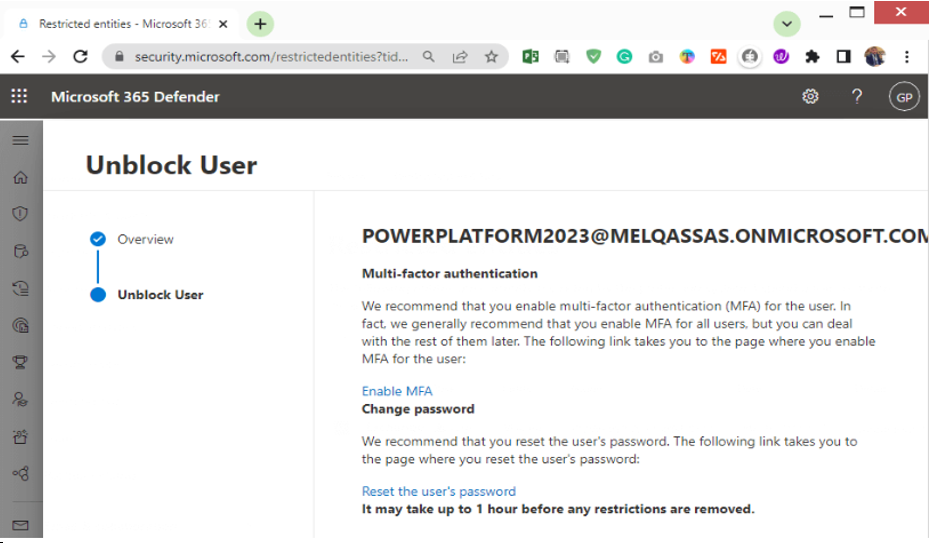
  • Find and pick users you wish to unblock on the Restricted Entities page by clicking on them, then from the above ribbon click on “Unblock“.
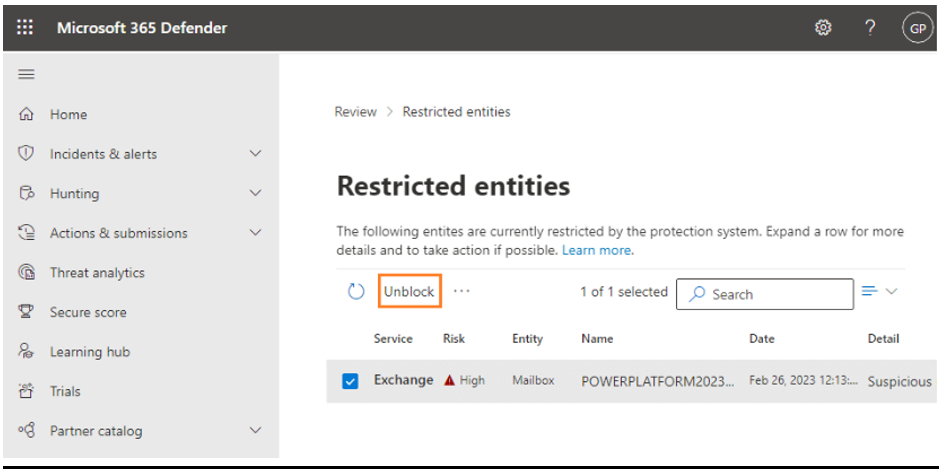
  • Follow the guide and unblock the user.
In conclusion, restricted email inboxes may not be widely known, but they play an important role in maintaining secure and organized communication in various settings. They offer a level of protection for sensitive information and ensure that only authorized individuals have access to it. However, they also come with their own challenges, which users need to be aware of. As we continue to navigate the world of digital communication, it is important to understand and appreciate the various methods used to safeguard our information.


Presenting the Mystery of Quarantined Email

Have you ever received an email that was mysteriously labeled as “quarantined” by your email provider? If so, you’re not alone. Many people have encountered this perplexing situation and wondered what it means and why it happens. In this post, we will delve into the mystery of quarantined email and shed some light on this often misunderstood phenomenon.


Firstly, let’s define what a quarantined email is. A quarantined email is essentially an email that has been flagged by your email provider as potentially harmful or suspicious. This means that the email has been isolated or “quarantined” from your inbox and placed in a separate folder for further inspection. This is done to protect you from potential threats such as viruses, spam, or phishing attempts.

STEP #1:

STEP #1: To open the Microsoft 365 Defender portal, go to https://security.microsoft.com. Go to Review.
 STEP #2:
  • Go to Quarantine.
  • Select the email that you want to release.
STEP #1: Go to Quarantine. Select the email that you want to release.

Why Email Quarantines:

In Microsoft 365 organizations with mailboxes in Exchange Online or standalone Exchange Online Protection (EOP) organizations without Exchange Online mailboxes, quarantine is available to hold potentially dangerous or unwanted messages.

Whether a detected message is quarantined by default depends on the following factors:

In conclusion, the mystery of quarantined email is not so mysterious after all. It is a precautionary measure taken by email providers to protect users from potential threats. By understanding the reasons behind quarantined emails and following the necessary steps, we can ensure the safety and security of our email inboxes.
 

Technology abstract blue architecture. AI generated Image by rawpixel.

Inbox overflowing? The answer’s in the cloud.

It's no secret that the internet has changed the way we store and access information. Gone are the days of dusty filing cabinets and piles of paperwork, replaced instead by online storage and archiving systems. Online archiving, also known as digital archiving, is the process of storing and preserving digital documents and records for future reference. This can include anything from text documents and images to videos and audio files.

The goal of online archiving is to create a secure and organized system for storing large amounts of information, making it easily accessible for years to come. So why is online archiving becoming increasingly popular? Well, for starters, it offers a much more efficient and space-saving solution compared to traditional paper storage. With online archiving, there's no need for physical space to store boxes of paperwork or folders, as all documents are stored digitally in the cloud.

Follow this simple tutorial to learn how online archiving can save you time!

STEP #1

• Go to admin.microsoft.com

• Go to Compliance Centre.

Mail Box

STEP #2:

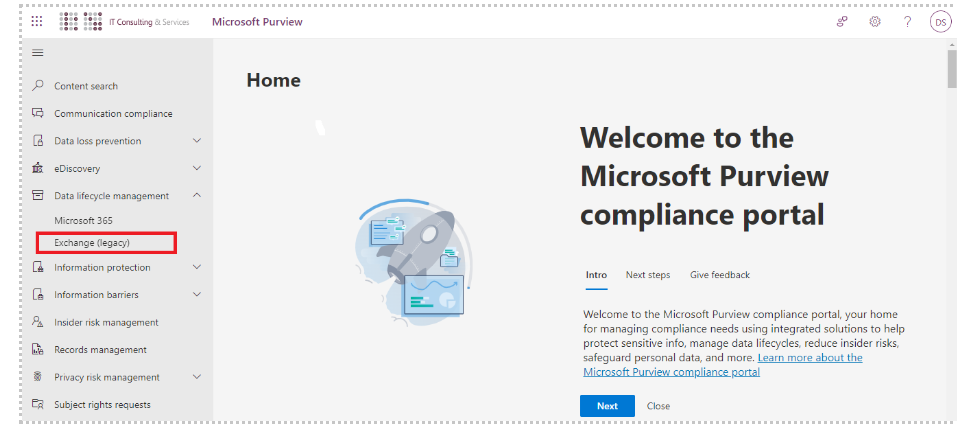
• Go to Exchange (Legacy)

STEP #3:

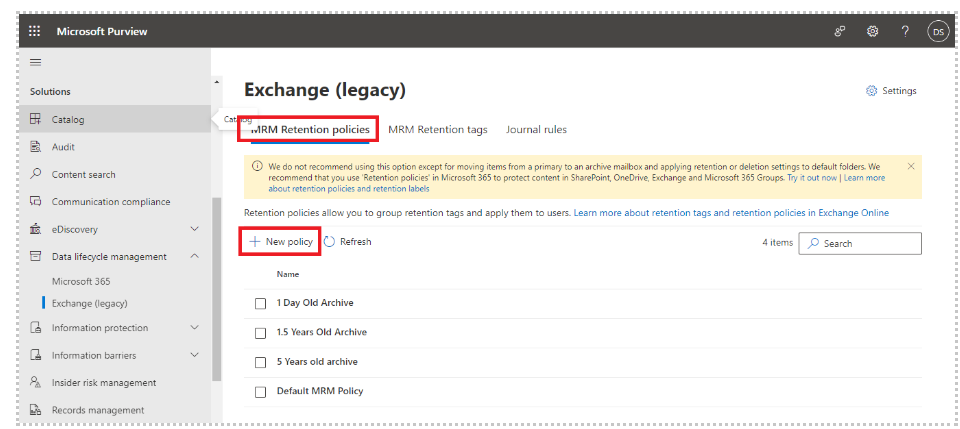
• Then go to MRM Retention Tags and create a new tag.

STEP #4:

  • On the Define retention settingspage, complete the following fields:
    1. When items reaches the following age (in days)Enter the duration of the retention period. For this scenario, items will be moved to the archive mailbox after 1095 days (3 years).
    2. For the Retention ActionSelect Move item to archive to move items to the archive mailbox when the retention period expires.
  • Select Next, and then review and submit to create the custom archive DPT.

The new archive DPT is displayed in the list of retention tags.

Online Archiving
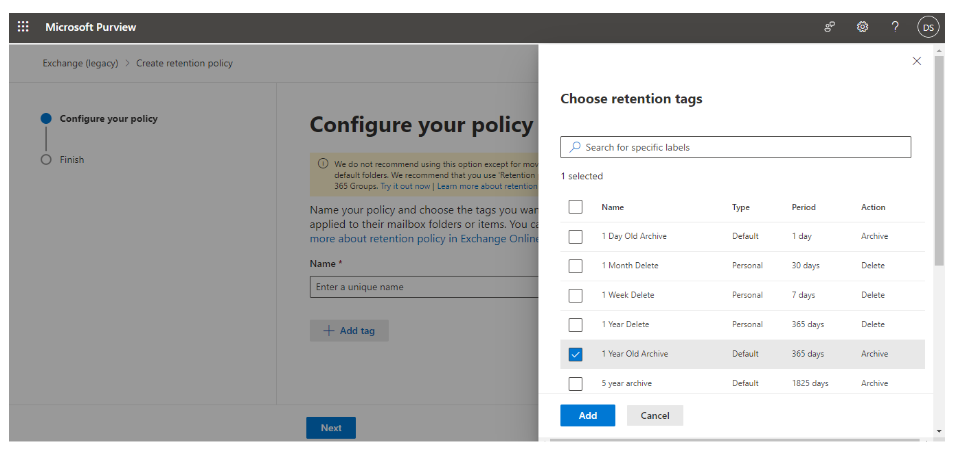
  • Now From Exchange select MRM Retention Policies and create a new Policy. 
  • Then enter a unique name and Add the tag that you created before. 
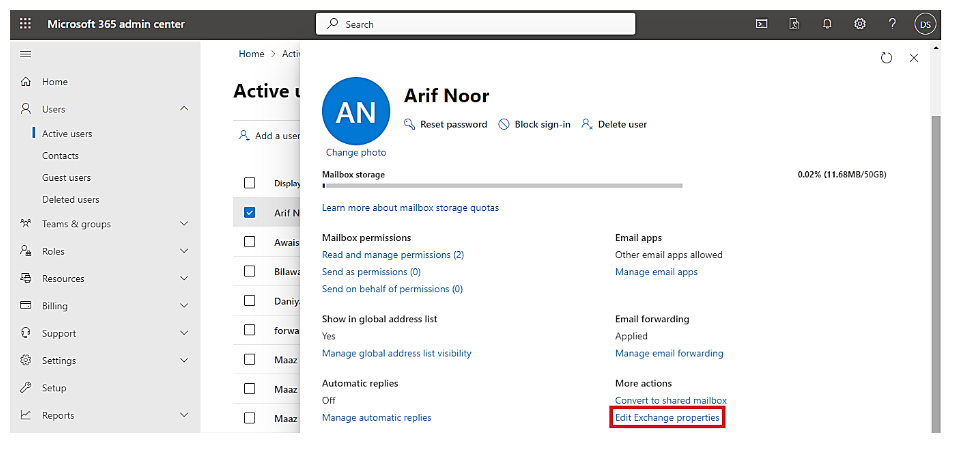
  • Now select the user for which you need to apply archiving on. 
  • Now click on Edit Exchange Properties. 
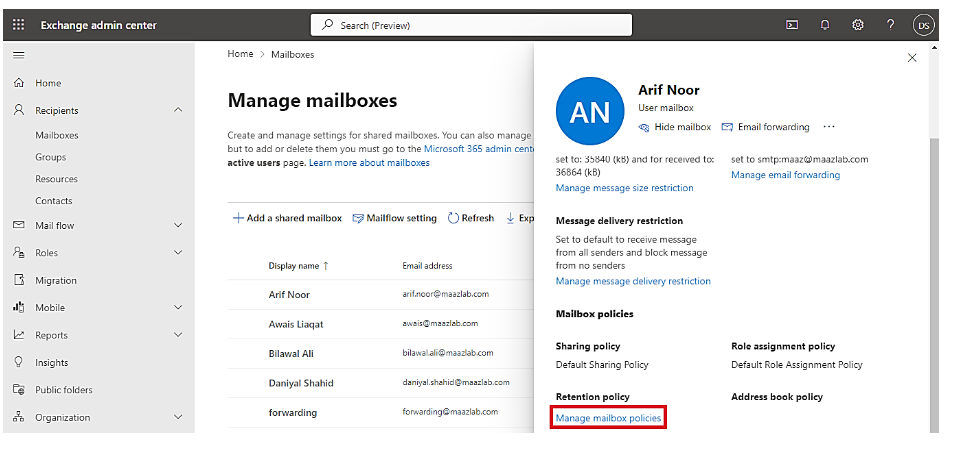
  • Now from the Mailbox tab, go to Manage mailbox policies. 
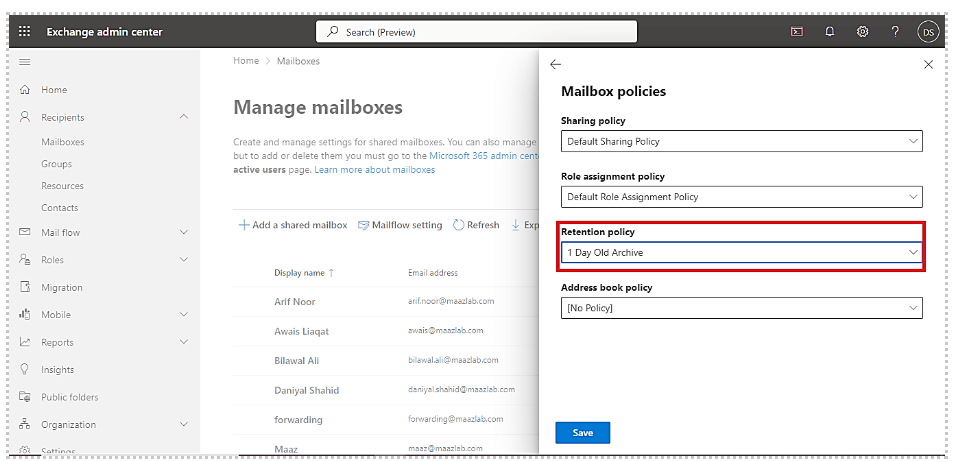
  • Now in the retention policy select the policy that you created. 
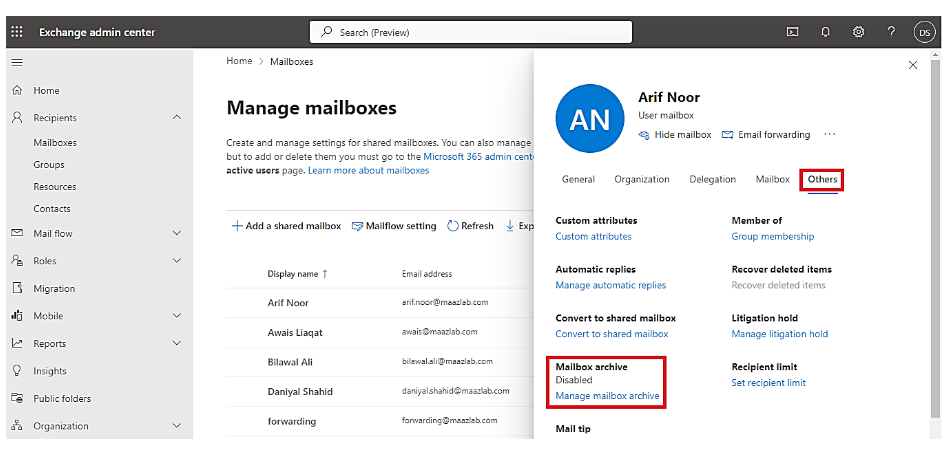
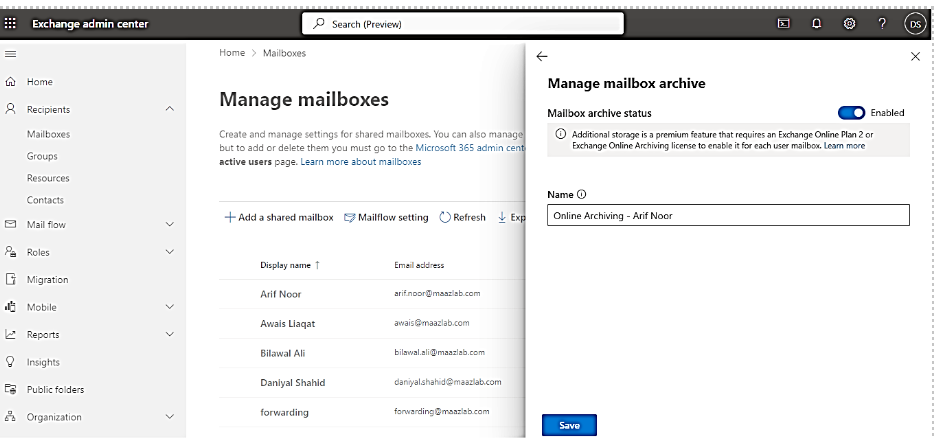
  • In the Others tab, click on Manage mailbox archive and enable it. 


And that’s it! Now, you know online archiving also helps businesses and organizations save on costs.


With no physical storage space required and less need for printing and maintaining paper documents, companies can save money on storage and printing expenses.


Ready to dive into the world of online archiving? Share your biggest concerns or best practices in the comments below!