Microsoft 365 and Its Significance to SMEs

Microsoft 365
Microsoft 365 and Its Significance to SMEs

Companies, that are built to last beyond the founder’s lifetime, have one thing in common. They are both efficient and effective. They optimize the bottom-line outcomes by utilizing their resources in a way that is unique, smart, and cost-effective. 

Now in the post-modern contemporary age, we see businesses equipping themselves with all sorts of innovative tools that are not only acting as the support system for the business but also a way to make processes faster, create an ease of access and generate efficiency.  

Traditionally, these high-end productivity tools were employed solely by large corporations, now although the inflection point has passed, Small Medium Business Enterprises ought to deploy these productive suites to remain relevant and thrive. 


SMBs Must Embrace AI and Productivity Tools to Thrive, Says Microsoft

The recent induction of Generative AI and Deep Learning mass adoption and rolling out in the consumer markets, its use cases are yet to be explored fully, but it remains foreseen and anticipated that organizations be they small or large will only propel further as leaders if they incorporate it in their core and augmented dimensions of businesses. 

Microsoft being a leader and staunch expert in AI, as is evident from the fact that they have funded the Open AI projects most notably “Chat Gpt”, and it intends to make these features available in their productivity suite. 

 As quoted directly from Microsoft official announcement:   SMBs are rapidly becoming the new adopters of AI. Businesses are using AI-powered tools for sales and marketing automation and business operations automation. In fact, in a recent survey of 550 businesses with fewer than 200 employees, 72 percent said they are familiar with AI tools, with 48 percent using them daily.” 

And these numbers are expected to grow by far and large sooner than thought! 

From Corporations to SMBs; How Microsoft 365 Paves the Way

Microsoft 365 offers a remarkable range of tools like Customer Voice, Dynamics 365, and Power Platform. These tools empower you to collect valuable customer feedback, streamline your processes, and even automate operations.  

It’s like having a personal assistant who can handle all your administrative tasks, so you can focus on what requires your most attention: running your business. Microsoft 365 is sort of like that personal assistant, but for your SME.   


“There are 11 million SMBs that now rely on Microsoft 365 solutions to help them achieve more than ever.” 

— Microsoft, 2023 


If we scour the blueprint of successful enterprises, we see Microsoft 365 services being avidly used in all of those spaces, enhancing the way businesses operate. From retail to telco to services, Microsoft 365 is helping businesses in every industry thrive.  

Retail businesses around the globe are improving their operational efficiency, customer satisfaction, and overall business performance using Microsoft 365 which is essentially enabling them to work better, serve customers better and sell more. Whereas in the service industry, Microsoft 365 helps service businesses give great customer service, work together easily, and make better decisions with their data, so they can serve their customers even better. 

So whether you’re in retail, hospitality, or the booming delivery industry, Microsoft 365 is your secret weapon to deliver outstanding customer service.  

Grow your Business with Microsoft 365

If you’re looking for ways to reach and exceed your business goals, Microsoft 365 is a great place to start. With its wide range of tools and services, Microsoft 365 can help you improve your business in every way.  

Ready to streamline your business for the future? Connect with ITCS today to get your business equipped with Microsoft 365! 

Office Offline Installation

OFFICE INSTALLATION
Offline Installation of Office

Step 1 - Download and install the Office Deployment Tool

  1. Create a folder on your hard drive and name it ODT. For this example, we’ll create it on the c:\ drive, like so: c:\ODT.
  2. Download the Microsoft 365 Deployment Tool from the Microsoft Download Center. Select Save As and save it to your downloads folder.
  3. In your downloads folder, double-click the Office Deployment Tool exe file to install it.
  4. If you see the User Account Control prompt that says, Do you want to allow this app to make changes to your device?, click Yes.
  5. Accept the Microsoft Software License Terms, and then click Continue.
  6. In the Browse for Folder dialog, select the ODT folder you created in earlier, and then click OK.

Step 2 - Create the configuration file

Visit to https://config.office.com/deploymentsettings 

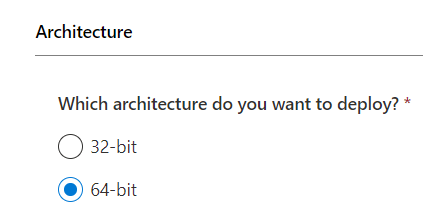
  • Select version of windows 32/64 bit which you want to deploy

  • Select which products and apps you want to deploy (Choose office Application e.g Office Apps / Visio / Project or any other application option).
  • Select Current Channel & Latest Version.
  • Select Desired Applications and click Next.
  • Choose your language and click Next.
  • Do not make any changes in Installation option and click Next.
  • Do not make any changes in Update and upgrade option and click Next.
  • Do not make any changes in License & Activation option and click Next.
  • Provide your organization name in General Field and click Next.

  • Do not make any changes in Application Preferences option and click Finish.
  • Click Export and download Configuration in XML format.

  • After downloading Configuration.xml file replace this file in ODT folder.

Office 365 email setup for Thunderbird (Pop/IMAP – Modern Authentication)

T

Thunderbird is a free email application that’s easy to set up and customize – and it’s loaded with great features. Thunderbird will need to be updated to version 77.0.b1 or higher in order to work with Office 365. You can download the latest version of Thunderbird here.

Pre-requisites

You need to ensure that you have already configured app registration in Azure Active Directory and granted users access to use the application. If not please follow steps in our earlier blog here.

Setting up Thunderbird
  • Launch Thunderbird. Select +New, Existing Email Account from the ‘hamburger’ menu.
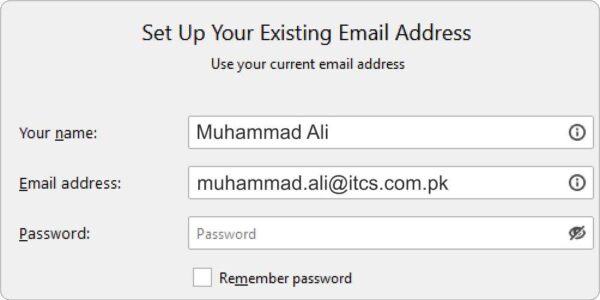
  • Enter your name and e-mail address. You can leave the password empty. Press Continue to have Thunderbird figure out where your mailbox is hosted. This should discover your account in Office 365.
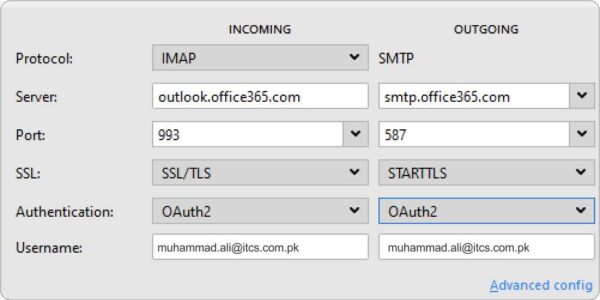
    The settings you see should be:
Username: username@domain.com
Password: Office 365 password
Protocol: IMAP
Incoming (IMAP): outlook.office365.com SSL
Outgoing (SMTP): smtp.office365.com STARTTLS
TB1
  • Click Done to confirm the creation of your account. If you are prompted for your password, hit Cancel.
  • Navigate to Account Settings -> Server Settings.
  • Under Authentication method, select OAuth2.
  • Navigate to Account Settings -> Outgoing Server.
  • Under Authentication method, select OAuth2.
  • Close the Account Settings. Select your Inbox, and you should be prompted with the Office 365 login page.
Manual Server Information
Username: username@domain.com
Password: Office 365 password

Incoming: IMAP
Server: outlook.office365.com
Port: 993
SSL Enabled: Yes
Authentication: OAuth2

Outgoing: SMTP
Server: smtp.office365.com
Port: 587
SSL Enabled: STARTTLS
Authentication: OAuth2
TB2

Start using OAuth for Office 365 POP/IMAP authentication

Microsoft has disabled Basic authentication for most Exchange Online protocols. Microsoft has documented the requirements and configuration steps to use OAuth with POP/IMAP in Microsoft 365 in this article: Authenticate an IMAP, POP or SMTP connection using OAuth | Microsoft Docs. You’ll see details about the registration of the required Azure AD applications and the permissions required for the access token to give Exchange Online the authorization of the mailbox access request.

OAuth 2.0 Authentication

Microsoft 365 (formerly Office 365) supports two kinds of OAuth 2.0 authentication:

  • Delegated authentication is suitable for desktop, mobile or web applications with signed-in user present.
    This mode is described in detail in another article.
  • App-only authentication is suitable for services or daemons with no user present. Instead, these unattended applications authenticate using client secrets (application credentials) to receive an access token, which is then used to gain access to a mailbox using IMAP, POP3 or EWS protocols.
SETUP OAUTH
Configuring Microsoft 365
Register your application

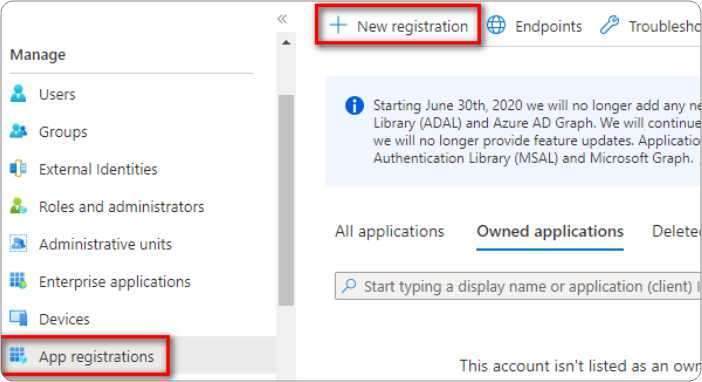
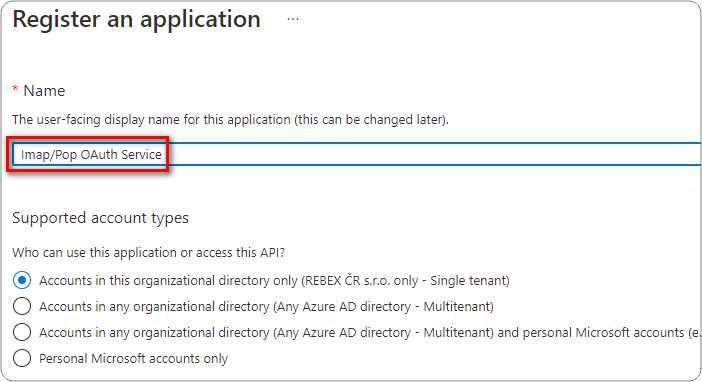
In Azure Portal ⇒ expand the left menu ⇒ select Azure Active Directory ⇒ select App registrations ⇒ click + New registration. (Azure Portal is constantly evolving, so if you cannot find this page, use the search bar.)

Name your application, choose which kind of accounts are going to use it, and click Register.

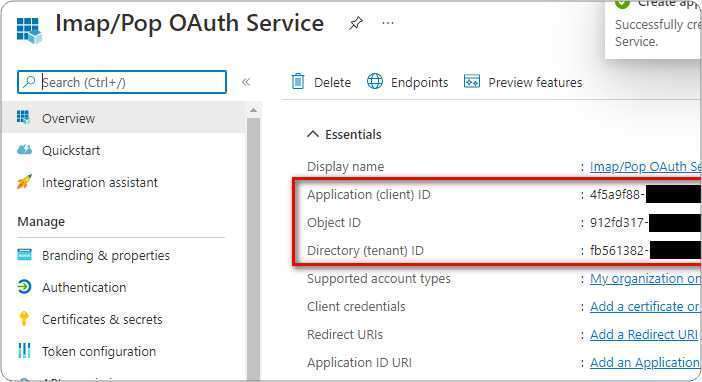
Once you successfully register your application you can view its associated IDs. Some of them will be needed later to obtain an OAuth 2.0 token.

Set up client secret (application password)

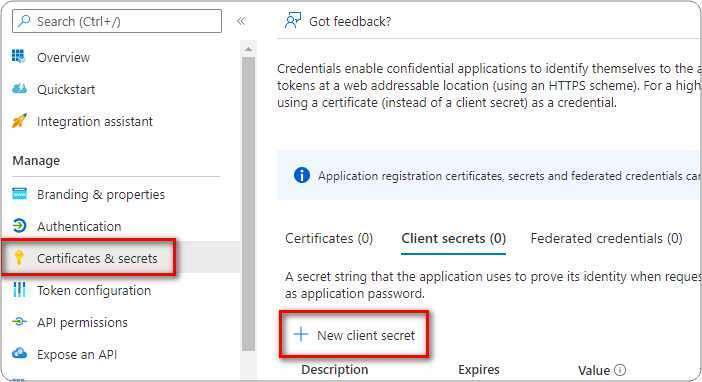
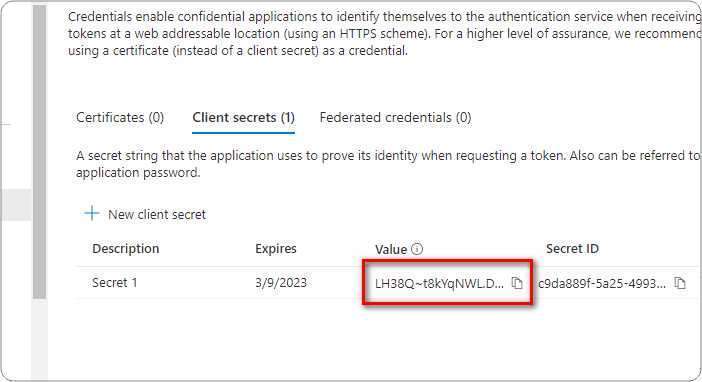
In the left menu, select Certificates & secrets ⇒ click + New client secret.

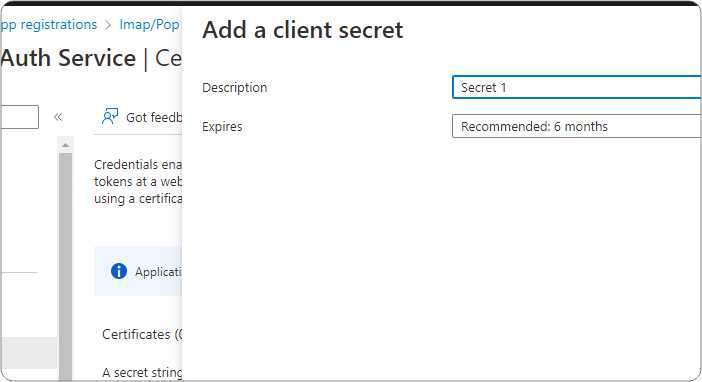
Provide some description for this secret, choose expiration period, and click Add.

Immediately copy and save the newly created client secret’s Value (not Secret ID). You will not be able to view the Value later anymore.

Add app permissions

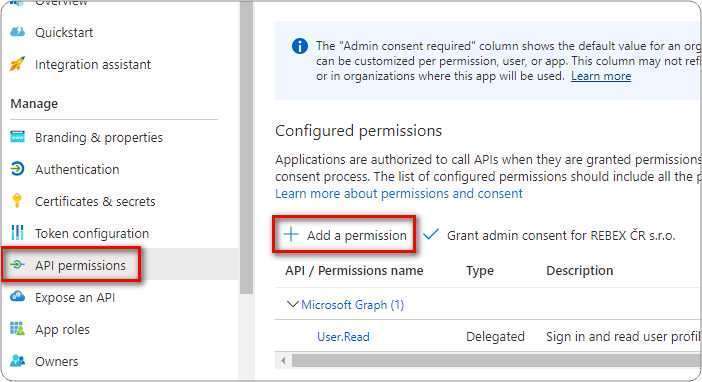
In the left menu, select API permissions ⇒ click + Add a permission.

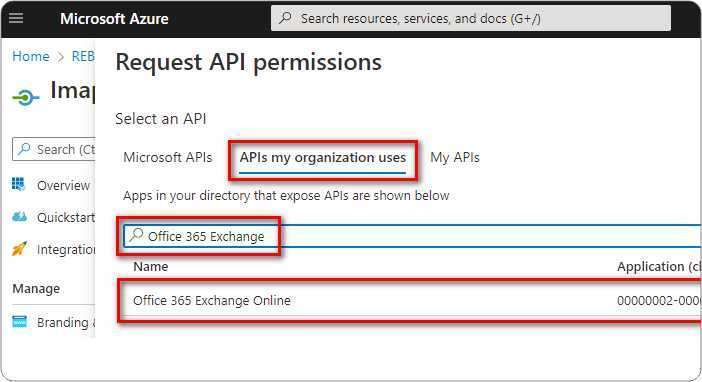
Navigate to APIs my organization uses tab ⇒ type Office 365 Exchange in the search bar ⇒ click Office 365 Exchange Online entry.

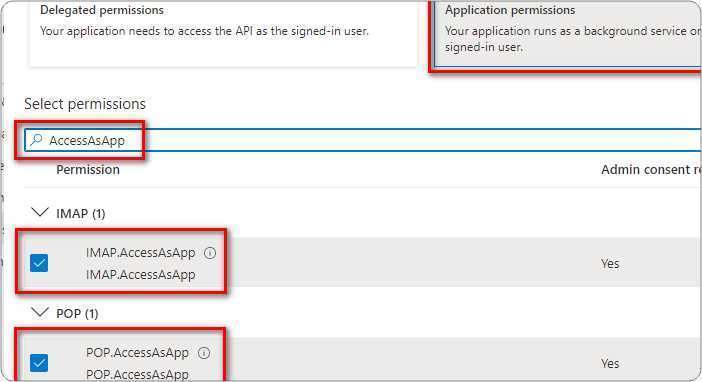
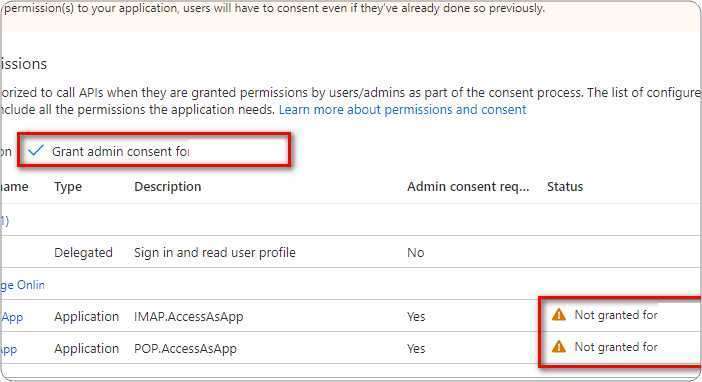
Click Application permissions ⇒ type AccessAsApp ⇒ check IMAP.AccessAsApp and/or POP.AccessAsApp ⇒ click Add permissions.

The newly-added IMAP.AccessAsApp and POP.AccessAsApp permissions have to be approved by your organization’s administrator. Ask them to grant consent to your application by clicking Grant admin consent for [organization].

Add mailbox access permissions

Before you proceed, make sure you have AzureAD and ExchangeOnlineManagement PowerShell modules installed. If not then run the commands below to install them.


Install-Module -Name AzureAD
Install-Module -Name ExchangeOnlineManagement


Next we need to fetch the principal ID for the application we just created using the Azure Portal. Fill in the App ID and Tenant Id and run the following:


$AppId = "YOUR_APP_ID_HERE"
$TenantId = "YOUR_TENANT_ID_HERE"
Import-module AzureAD
Connect-AzureAd -Tenant $TenantId
($Principal = Get-AzureADServicePrincipal -filter "AppId eq '$AppId'")
$PrincipalId = $Principal.ObjectId


Now we need to register the service principal for your application


$DisplayName = "Service Principal for IMAP/POP3"
Import-module ExchangeOnlineManagement
Connect-ExchangeOnline -Organization $TenantId
New-ServicePrincipal -AppId $AppId -ServiceId $PrincipalId -DisplayName $DisplayName


Add FullAccess mailbox permissions to all mailboxes you want to access from your application using:


Add-MailboxPermission -User $PrincipalId -AccessRights FullAccess -Identity "mailbox.1@domain.org"
Add-MailboxPermission -User $PrincipalId -AccessRights FullAccess -Identity "mailbox.2@domain.org"
Add-MailboxPermission -User $PrincipalId -AccessRights FullAccess -Identity "mailbox.3@domain.org"


At this point you have registered an application for accessing Office 365 mailboxes via IMAP or POP3 protocol and received its Application (client) ID, Client secret and Directory (tenant) ID.

These strings are going to be used by your application to authenticate to Microsoft 365 via OAuth 2.0 and receive an OAuth token. This token is then used to authenticate to Exchange Online using IMAP or POP3 protocols.